Learn how to set up ™Cayia, connect your own AI API key, track money, run POS,
manage inventory, sync devices, and control project contracts from one organized guide.
™Cayia is a control center for modern multi-entrepreneurs. It brings financial tracking, POS, receipts, inventory, Cloud Sync, AI guidance, and project contracts into one organized workspace.
When to use it
Use this flow when creating a new ™Cayia account, choosing a plan, installing the desktop app, opening ™Cayia in the browser, or adding it to a phone as a PWA.
Steps
Go to cayia.app and choose the option to open the ™Cayia web app.
Create your account with your preferred email and password.
Choose the plan that matches your operation: Solo, Business, or Master Plan / Pro Business.
Open ™Cayia from the browser at https://cayia-sync-app.web.app/ or install the Windows version when available.
On mobile, open ™Cayia in the browser menu and choose the option to add it to the home screen as a PWA.
When the app updates, refresh the browser or reopen the desktop app to load the newest version.
Important tips
Use the same account across devices if you plan to use Cloud Sync.
Start with the dashboard first, then configure AI, POS, inventory, and projects as needed.
Project Contracts are part of the Master Plan / Pro Business plan.
Common problems
If you cannot sign in, confirm the email, password, and internet connection.
If the app looks outdated, refresh the page or clear the browser cache.
Video tutorial
Initial Setup
Configure your business
Set the basic information ™Cayia needs to organize your numbers, taxes, sync status, and device access.
What this helps you do
This setup keeps your dashboard, receipts, POS, reports, and sync behavior aligned with your real business.
When to use it
Use it after creating an account, changing business information, adding a new device, or turning on Cloud Sync.
Steps
Open Settings from the sidebar.
Add your business name and basic profile information.
Review currency, tax preferences, receipt behavior, and appearance.
Open the sync area and connect Firebase Sync if your plan supports Cloud Sync.
Add approved devices and confirm each device shows as synced.
Save changes and return to the dashboard.
Important tips
Cloud Sync availability depends on your subscription plan.
Keep tax settings updated before exporting financial reports.
Common problems
If a device does not appear, sign out and sign in again on that device.
If sync does not activate, confirm the plan, connection, and account owner permissions.
Video tutorial
Subscription & Billing
Subscription & Billing Help
Use this guide to choose a plan, buy a subscription, upgrade, manage billing, and understand how Stripe handles secure payments for ™Cayia.
What this helps you do
This section explains how ™Cayia subscriptions work inside the app. It covers plan selection, Stripe checkout, automatic upgrades, billing management, receipts, renewal, payment methods, and what happens when premium access changes.
SoloIncome tracking, expenses, receipts, AI advisor with your own API key, and reports.
BusinessEverything in Solo plus POS, inventory, Cloud Sync, users/cashiers, and team access control.
Pro BusinessEverything in Business plus Project Contracts, Rental Management, photo annexes, and expanded sync access.
How to buy a subscription
Open ™Cayia and go to Settings > Subscription.
Review the available plans: Solo, Business, and Pro Business.
Choose the plan that matches the way you work and the features you need.
Select the package from the subscription screen.
™Cayia sends you to a secure Stripe checkout flow.
Enter or confirm your payment details in Stripe.
After payment is completed, return to ™Cayia and allow the app to refresh your subscription status.
Confirm your plan badge and available features from Settings > Subscription.
How to upgrade a plan
If you already have an active subscription, you can upgrade directly inside ™Cayia. Common upgrades are Solo > Business or Business > Pro Business.
Go to Settings > Subscription.
Find the plan you want to move to.
Press Switch To [New Plan].
Review the confirmation message before continuing.
™Cayia processes the change through Stripe using the payment method already registered in Stripe.
When Stripe confirms the change, ™Cayia updates your plan automatically.
New permissions and features are unlocked based on the upgraded plan.
If a feature still appears locked, refresh ™Cayia or reopen the app after the upgrade completes.
1. Choose upgradePress Switch To Business or Switch To Pro Business.
2. Stripe confirmsStripe handles the secure payment change using the billing account.
3. ™Cayia unlocksPermissions and premium features update automatically after approval.
How to manage your subscription
In Settings > Subscription, use Billing Portal or Manage Subscription to open Stripe Billing Portal.
View invoices and billing history.
Download receipts for your records.
Review payment history and renewal details.
Change or update your payment method.
Update billing information.
Cancel the subscription when you no longer want renewal.
Important billing notes
™Cayia does not store your card number.
Payment processing is handled securely by Stripe.
Upgrades are designed to apply automatically after Stripe confirms the change.
Features, device limits, sync access, team access, Project Contracts, and Rental Management depend on your active plan.
If a subscription expires, is canceled, or payment fails, some premium features may become locked or unavailable.
If billing status looks incorrect, refresh ™Cayia and check Stripe Billing Portal before creating a support request.
Subscription FAQ
Does ™Cayia store my card?
No. Stripe handles payment processing and card management.
Where do I see invoices?
Open Settings > Subscription > Billing Portal or Manage Subscription.
Can I upgrade inside the app?
Yes. Use Switch To [New Plan] from the subscription screen.
What happens if payment fails?
Premium features may be restricted until billing is updated and the subscription becomes active again.
Can I cancel?
Yes. Cancellation is handled through Stripe Billing Portal when available for your subscription.
BYOK AI
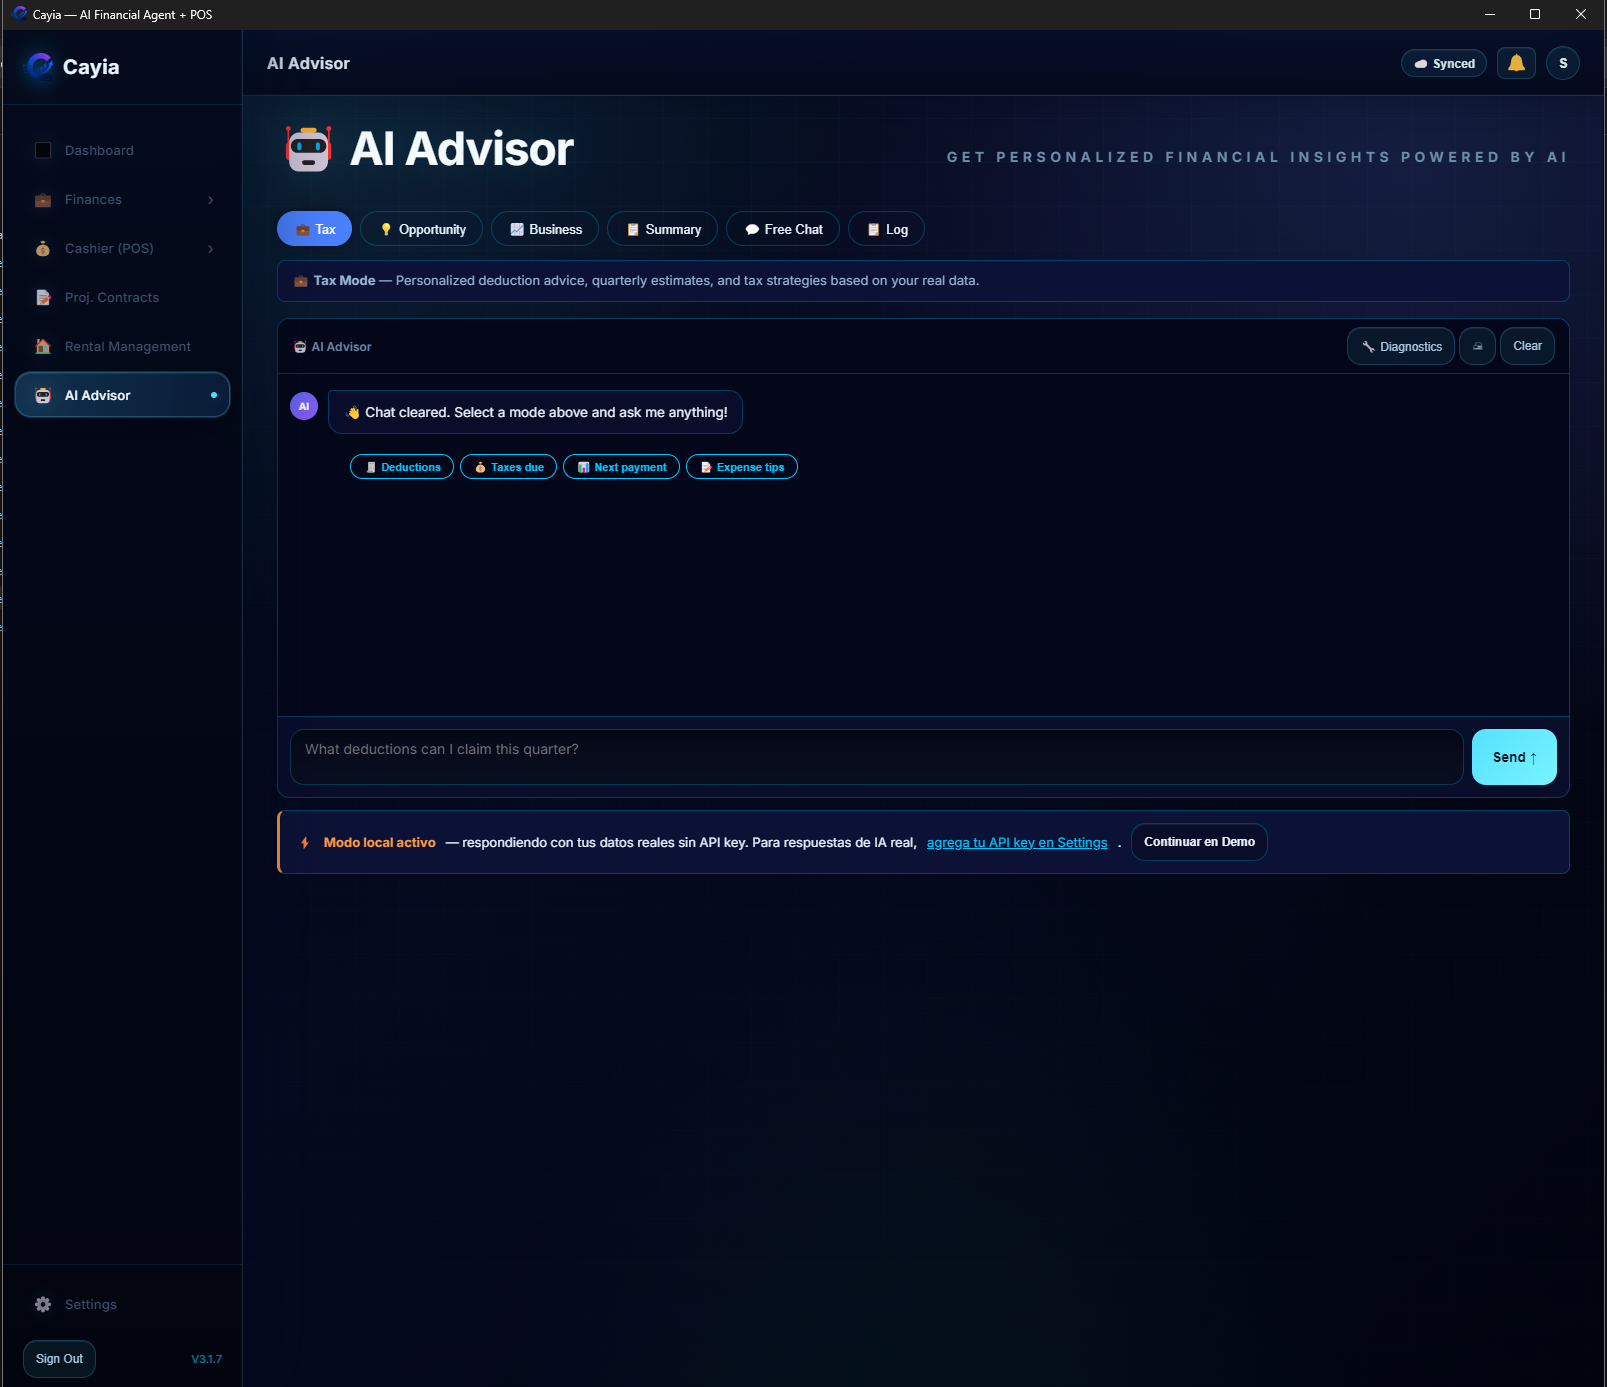
Connect AI with your own API key
™Cayia uses a BYOK model, which means Bring Your Own Key. You control the AI provider, usage, and cost.
What this helps you do
Connecting an API key unlocks advanced AI features, including financial questions, receipt analysis, summaries, inventory checks, and project guidance.
™Cayia does not include an API key inside the subscription. To use advanced AI features, the user must connect their own API key from a compatible provider such as OpenAI, Gemini, Mammouth, or DeepSeek when available. This gives the user more control, privacy, and flexibility.
When to use it
Use this setup before asking AI to analyze receipts, review financial health, summarize projects, or answer questions about your business data.
Steps
Create an API key with a compatible provider such as OpenAI, Gemini, or Mammouth.
Open ™Cayia and go to Settings, then AI Config.
Choose the provider you want to connect.
Paste your API key into the secure API key field.
Save the configuration and run a simple AI test question.
If the provider supports model selection, choose the model that fits your cost and quality needs.
Important tips
Never share your API key in screenshots, emails, or support messages.
Rotate the key from your provider dashboard if you believe it was exposed.
™Cayia can still be used without AI for core tracking features.
Common problems
If AI does not respond, confirm the API key is active and has billing enabled with the provider.
If a provider is not available yet, choose another compatible provider until support is added.
Video tutorial
Video tutorial coming soon
Dashboard
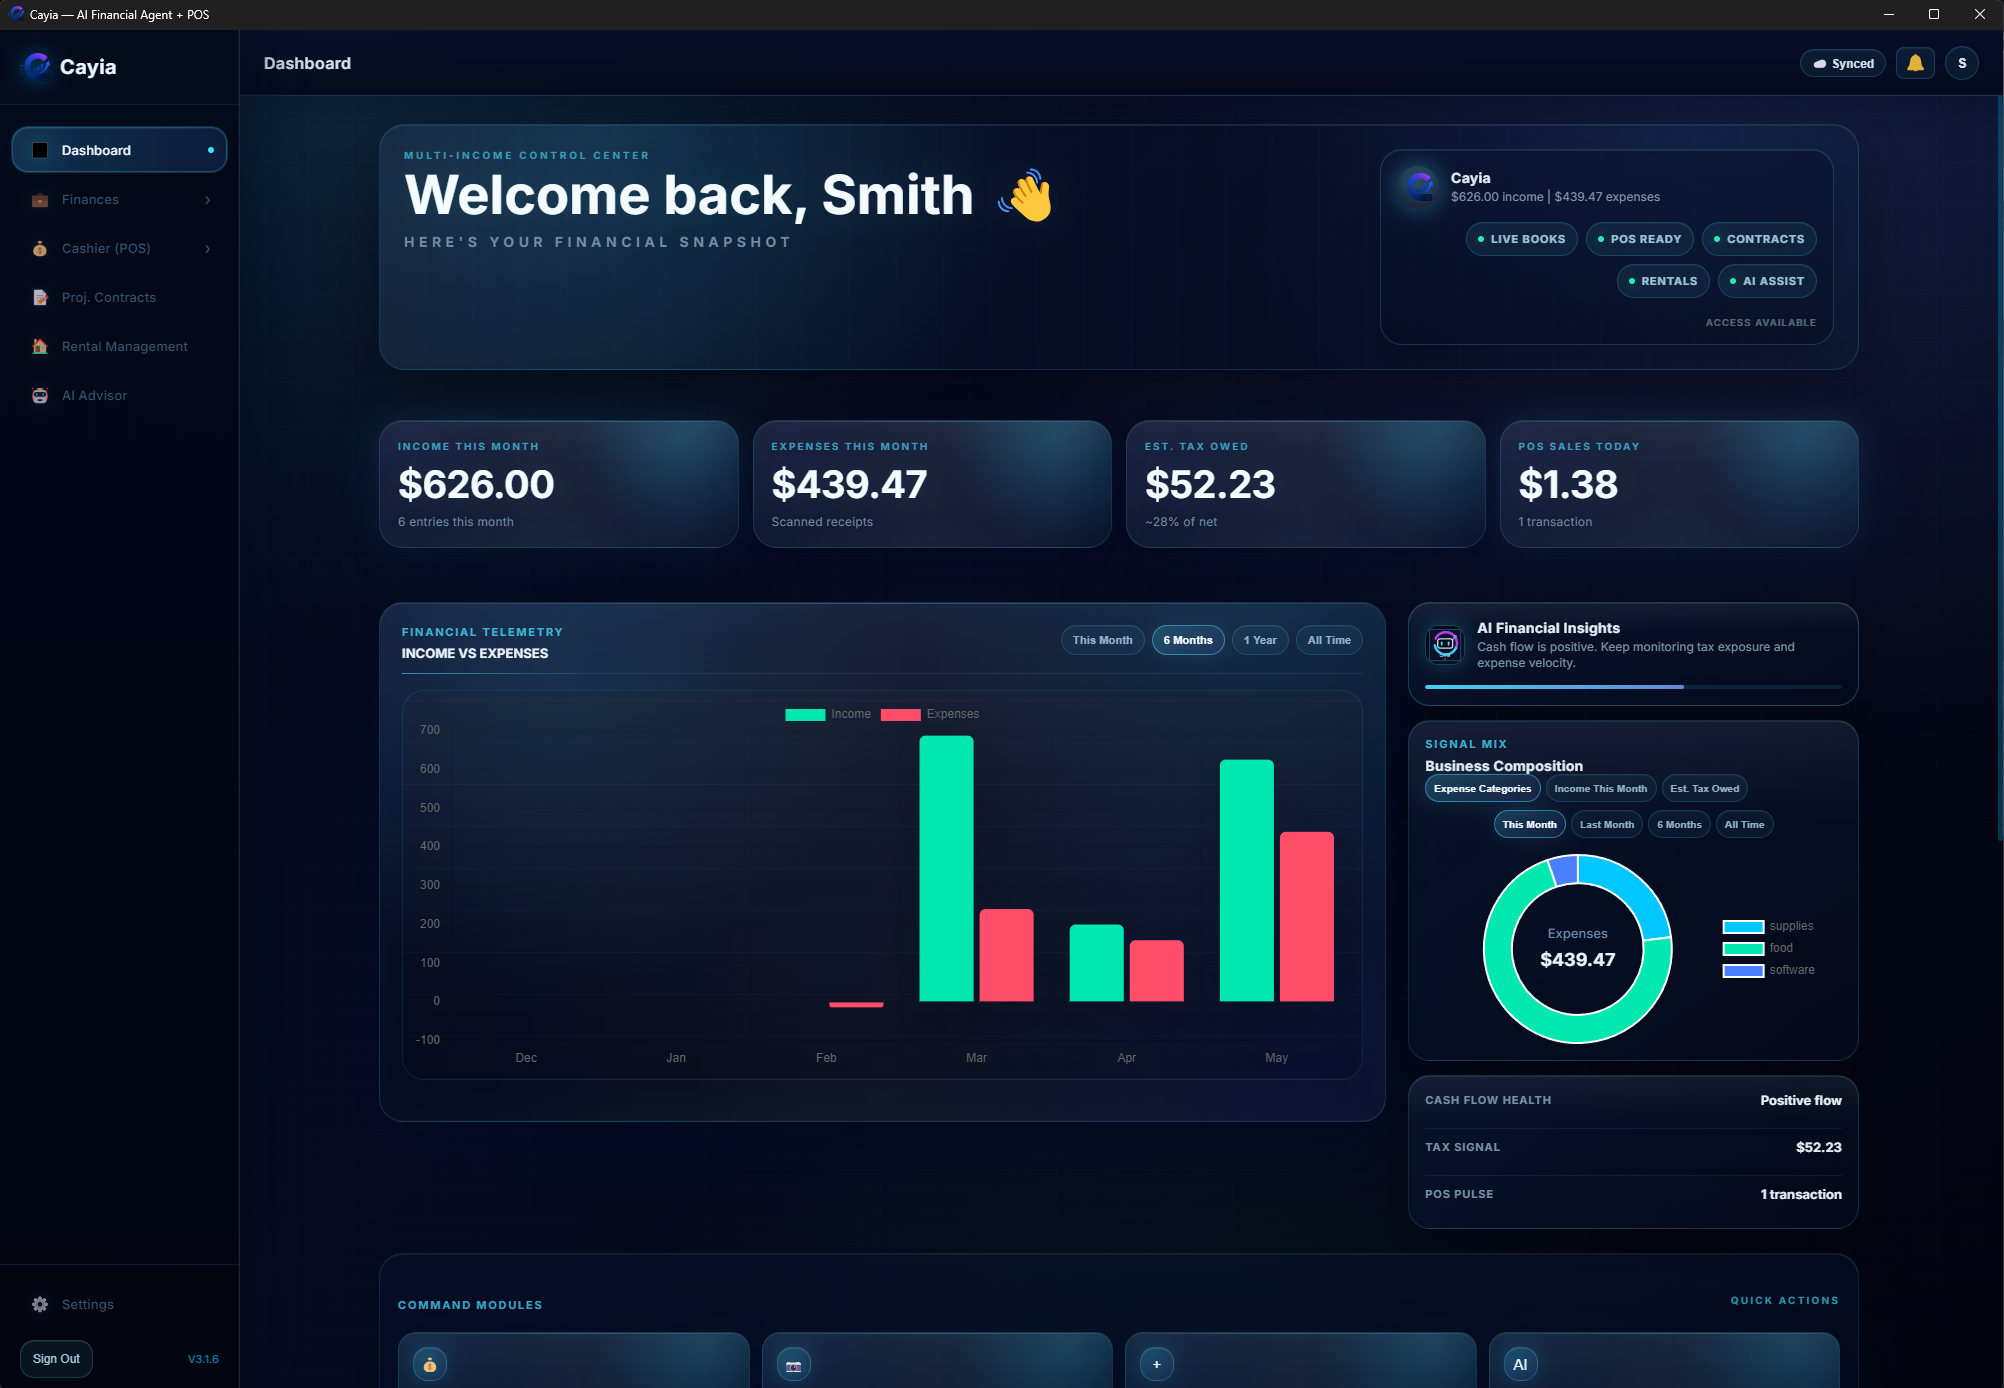
Read your financial dashboard
The dashboard gives you a quick financial snapshot across income, expenses, estimated tax, POS sales, and trends.
What this helps you do
Use the dashboard to understand what came in, what went out, how POS is performing, and where your money is concentrated.
When to use it
Use it at the start or end of each day, before making a purchase, after importing receipts, or before reviewing taxes.
Steps
Open Dashboard from the sidebar.
Review income, expenses, estimated tax owed, and POS sales today.
Use quick actions to create a sale, scan a receipt, log income, or ask AI.
Read charts to compare income and expenses over time.
Use category breakdowns to spot the areas consuming the most budget.
Important tips
Dashboard totals are only as accurate as the income, expense, POS, and project data entered.
Estimated tax is an operational estimate, not a replacement for tax advice.
Common problems
If a chart looks empty, add income, receipts, or sales first.
If values look old, refresh the app and confirm sync status.
Video tutorial
Video tutorial coming soon
Income
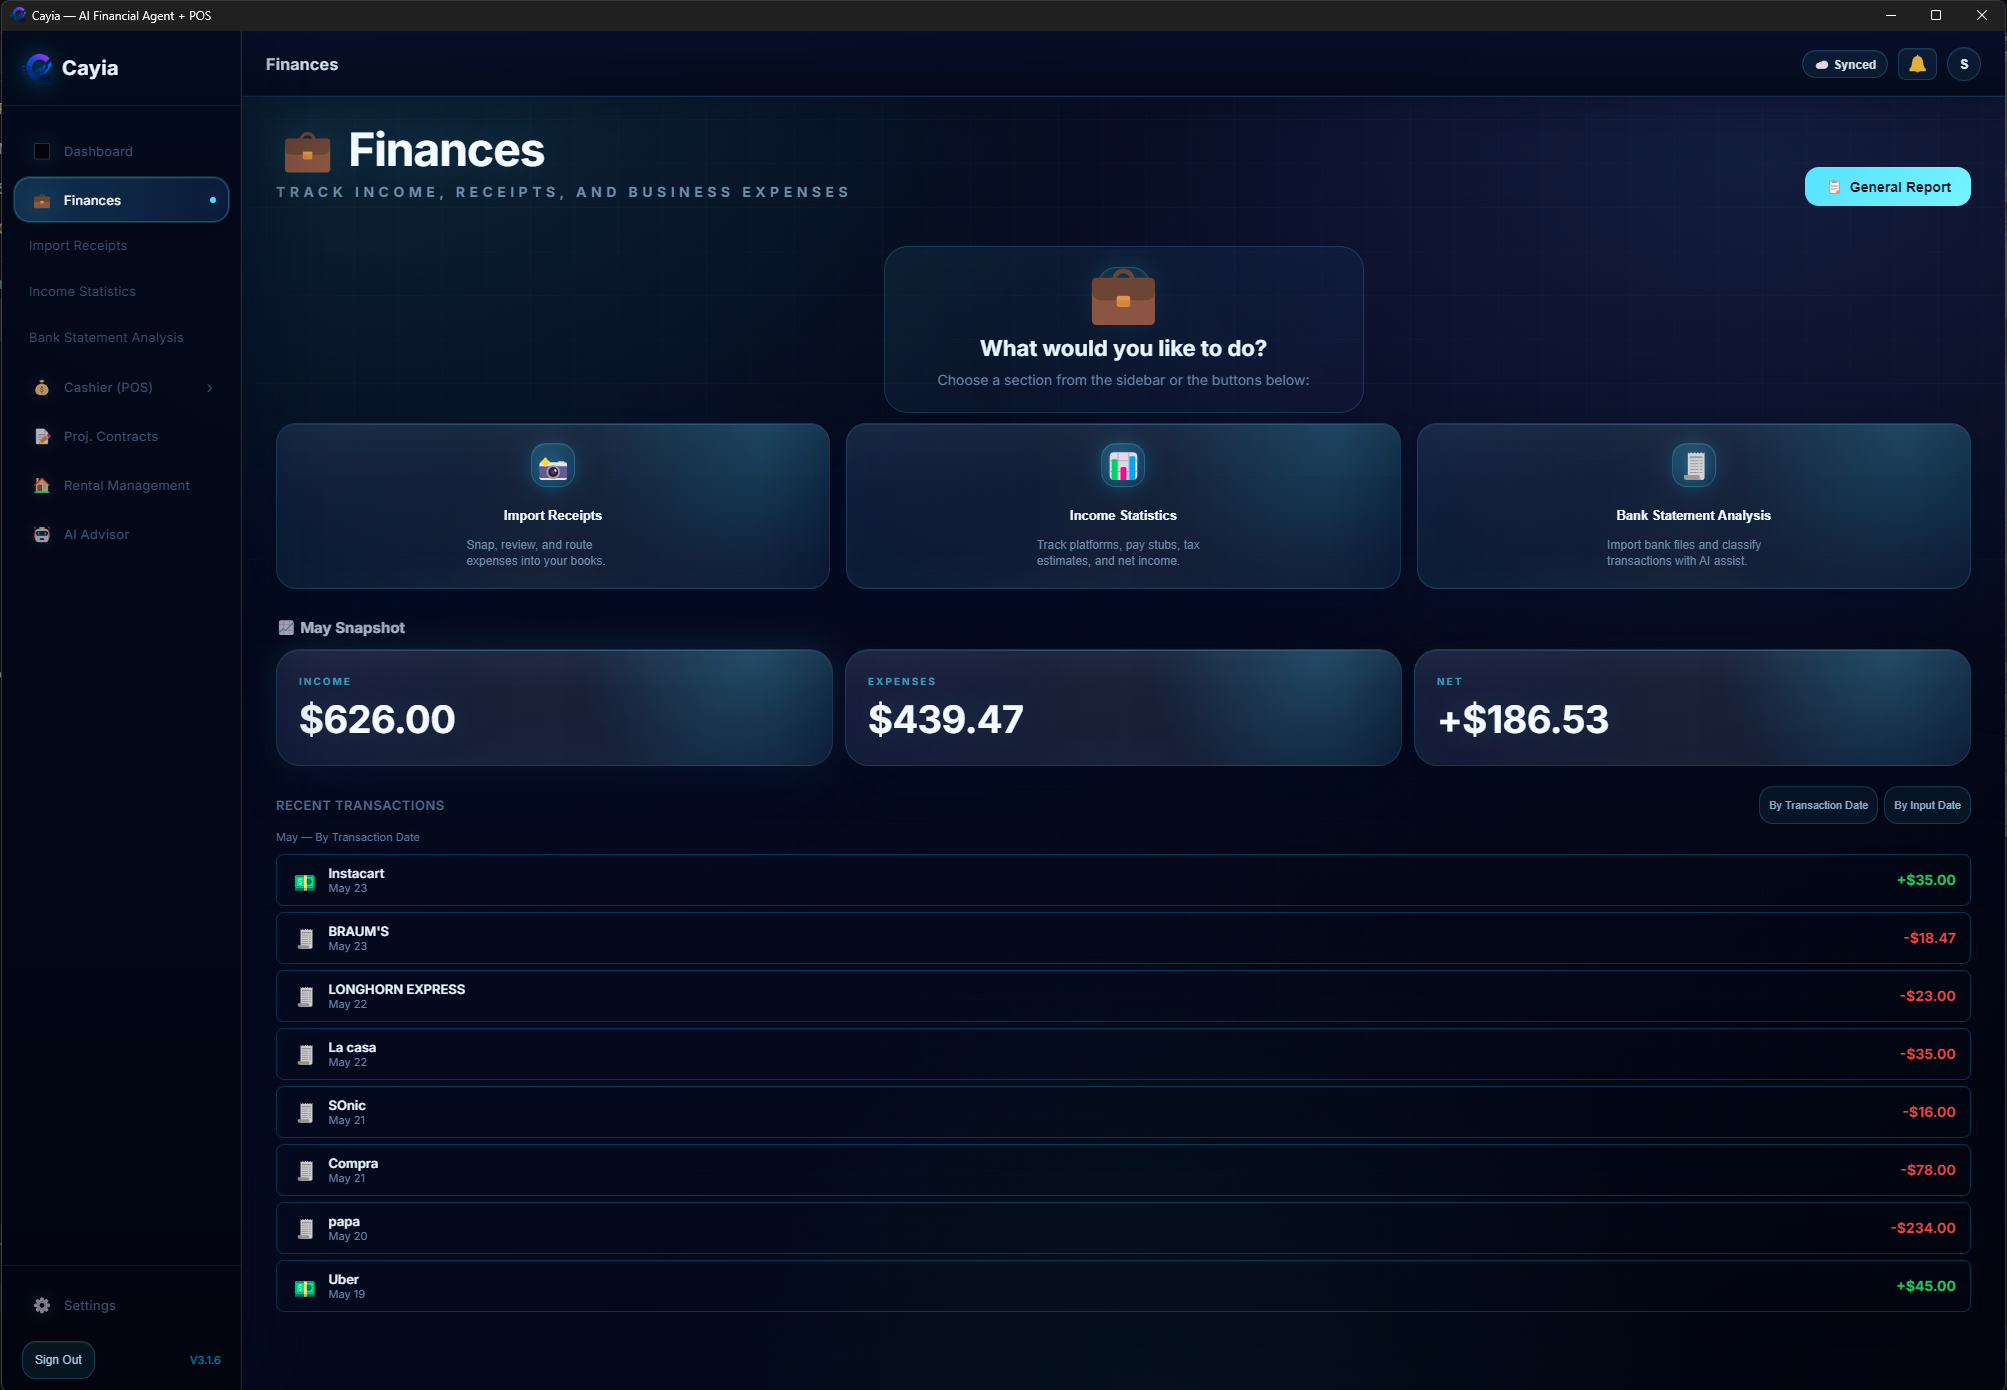
Track income
Add and organize money coming into your business or personal operation.
What this helps you do
Income tracking helps you understand revenue from side jobs, deliveries, services, projects, and store activity.
When to use it
Use it when you receive cash, digital payments, tips, project deposits, service income, or non-POS revenue.
Steps
Open the income or finances area.
Choose the option to log income.
Enter the amount, date, source, and category.
Save the entry and confirm it appears in recent transactions.
Use search or filters to find older income entries.
Important tips
Use consistent categories to make reports easier to read.
Archive entries only when you need to keep history without showing them in active views.
Common problems
If income does not show on the dashboard, confirm the date is inside the visible reporting period.
Video tutorial
Video tutorial coming soon
Expenses & Receipts
Record expenses and receipts
Track spending, scan receipts, attach evidence, and use AI to speed up entry.
What this helps you do
This area helps you capture business costs and keep the proof needed for reports, taxes, and project profitability.
When to use it
Use it after buying materials, fuel, tools, inventory, supplies, meals, or any expense you need to track.
Steps
Open finances, expenses, or the scan receipt quick action.
Take a receipt photo or upload an image/document.
If AI is enabled, allow ™Cayia to read vendor, amount, date, and category suggestions.
Review and correct the detected information before saving.
Attach evidence and assign the expense to a category or project when needed.
Important tips
Always review AI-detected values before saving.
Use categories that match how you want to export reports later.
Common problems
If a receipt scan is wrong, retake the photo with better lighting and a flat angle.
If AI does not analyze, check your API key configuration.
Video tutorial
Video tutorial coming soon
POS / Cashier
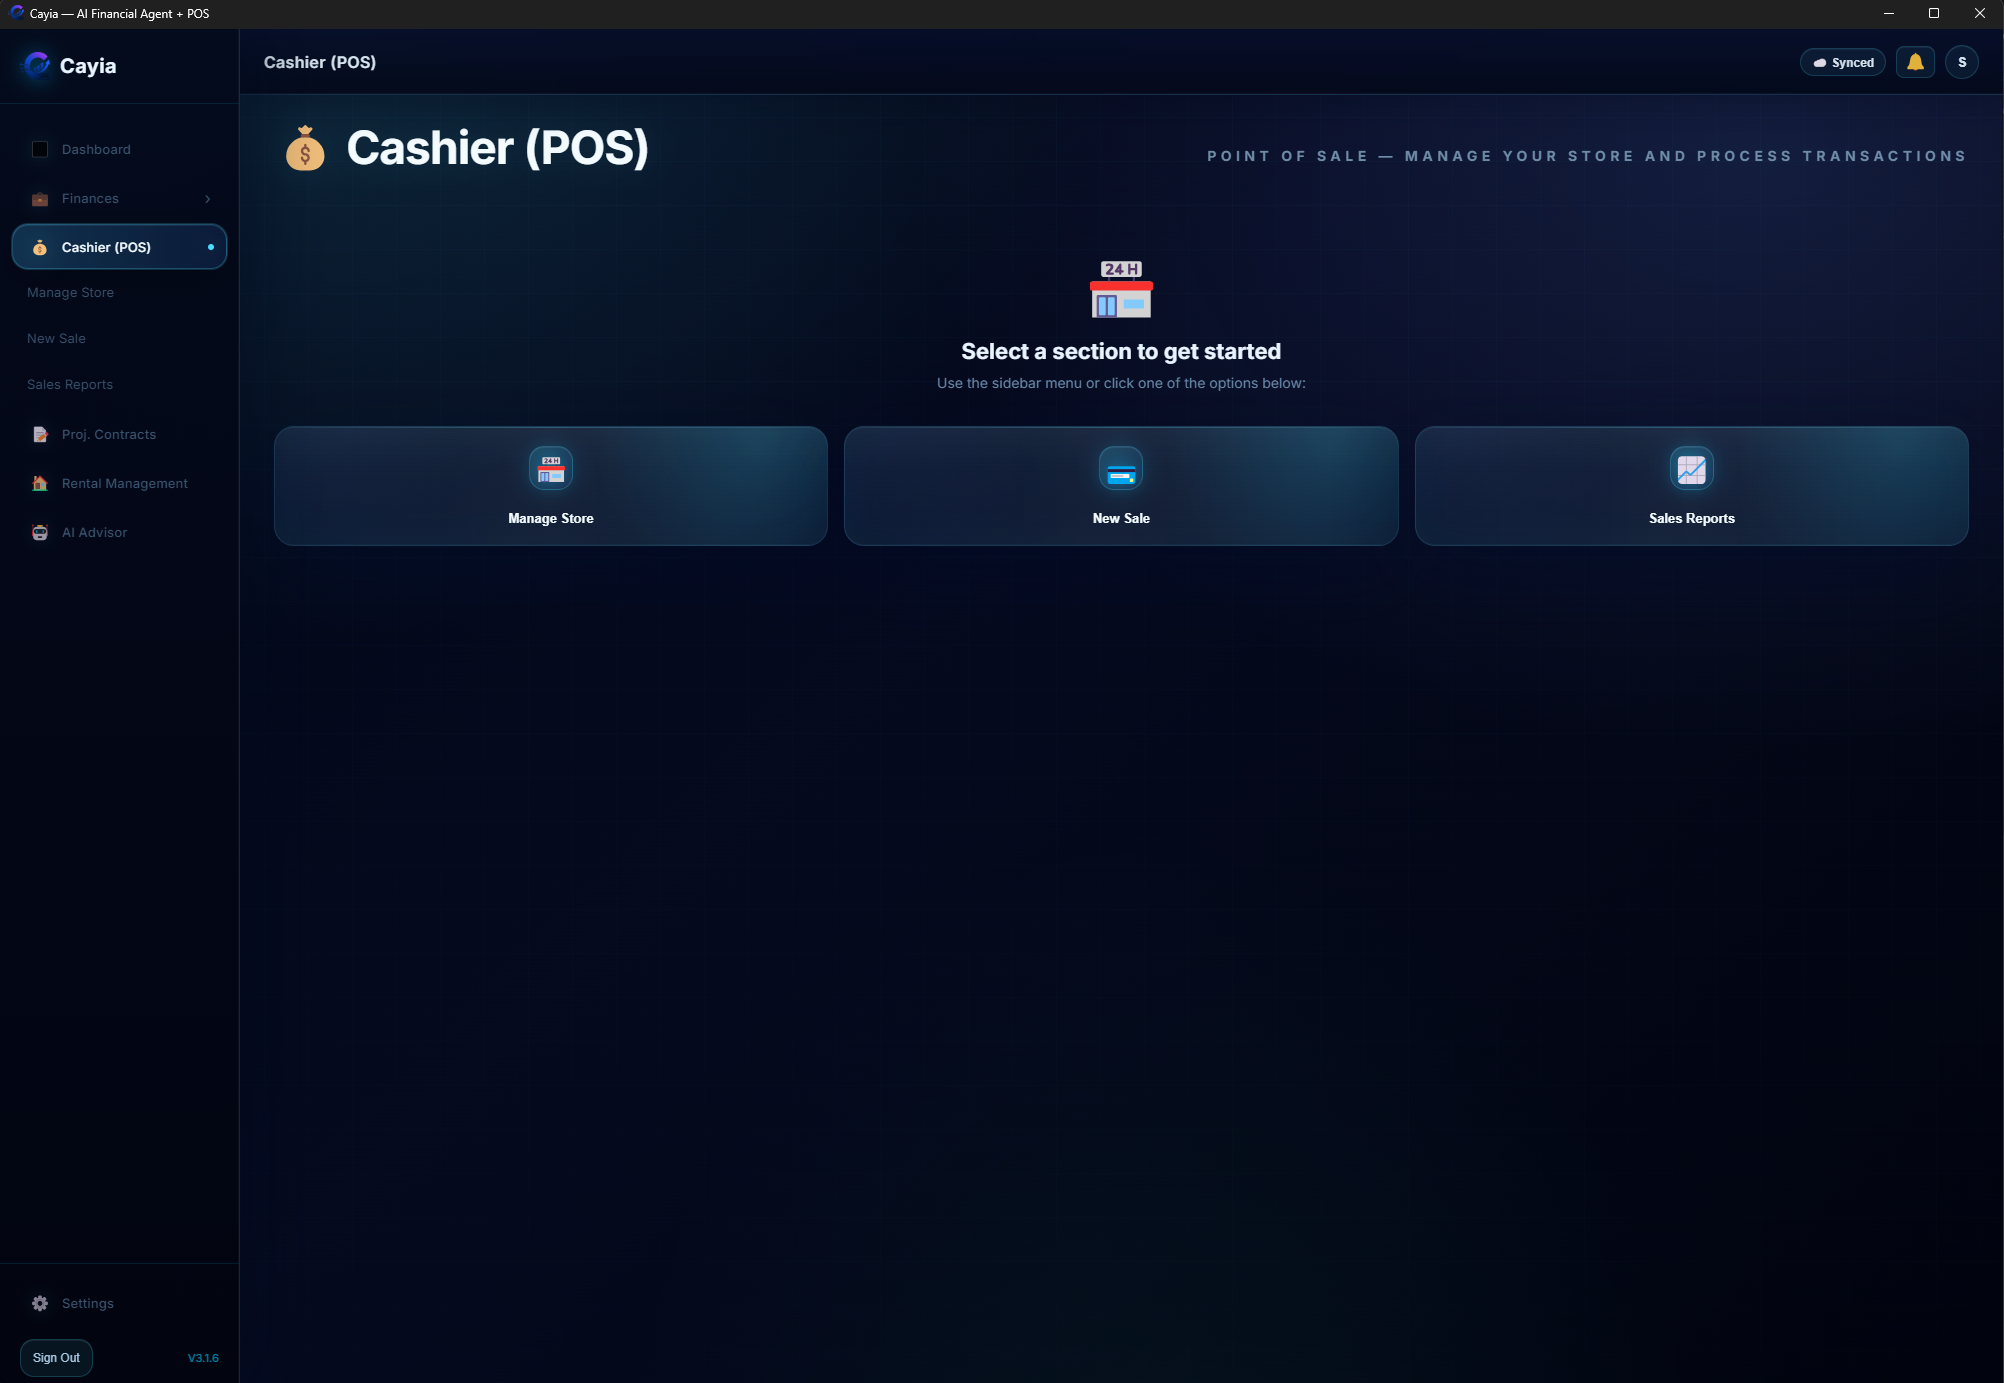
Use the POS / Cashier
Run sales, search products, scan barcodes, charge customers, and review past sales.
What this helps you do
The cashier module is for direct sales and store-style operations that need products, receipts, and sales reports.
When to use it
Use it when selling a product or service at the counter, from a device, or during mobile business activity.
Steps
Open Cashier (POS) from the sidebar.
Choose New Sale.
Search for products or scan a barcode.
Add quantities, discounts, or adjustments when needed.
Charge the customer and generate the receipt.
Open sales reports to review previous sales.
Important tips
Keep inventory updated so POS product search is accurate.
Use user or cashier accounts when multiple people sell from the same business.
Common problems
If POS cannot find a product, confirm the product exists and the barcode matches.
Inventory connects your products to POS sales, stock control, reports, and AI analysis.
When to use it
Use it when adding new products, correcting product details, importing files, or preparing labels.
Steps
Open the inventory or manage store area.
Add a product with name, price, category, stock, and barcode if available.
Edit product details when price or stock changes.
Use tombstone delete when you need to remove a product while preserving sync history.
Import inventory from Excel, PDF, or AI-readable documents when supported.
Generate or print barcode labels for products that need scanning.
Important tips
Use tombstone deletion for synced systems so old records do not reappear.
Review imported inventory before using it in live POS sales.
Common problems
If a label does not print, confirm the printer, label size, and browser print settings.
If stock is wrong, check recent sales and imports.
Video tutorial
Video tutorial coming soon
Pro Business
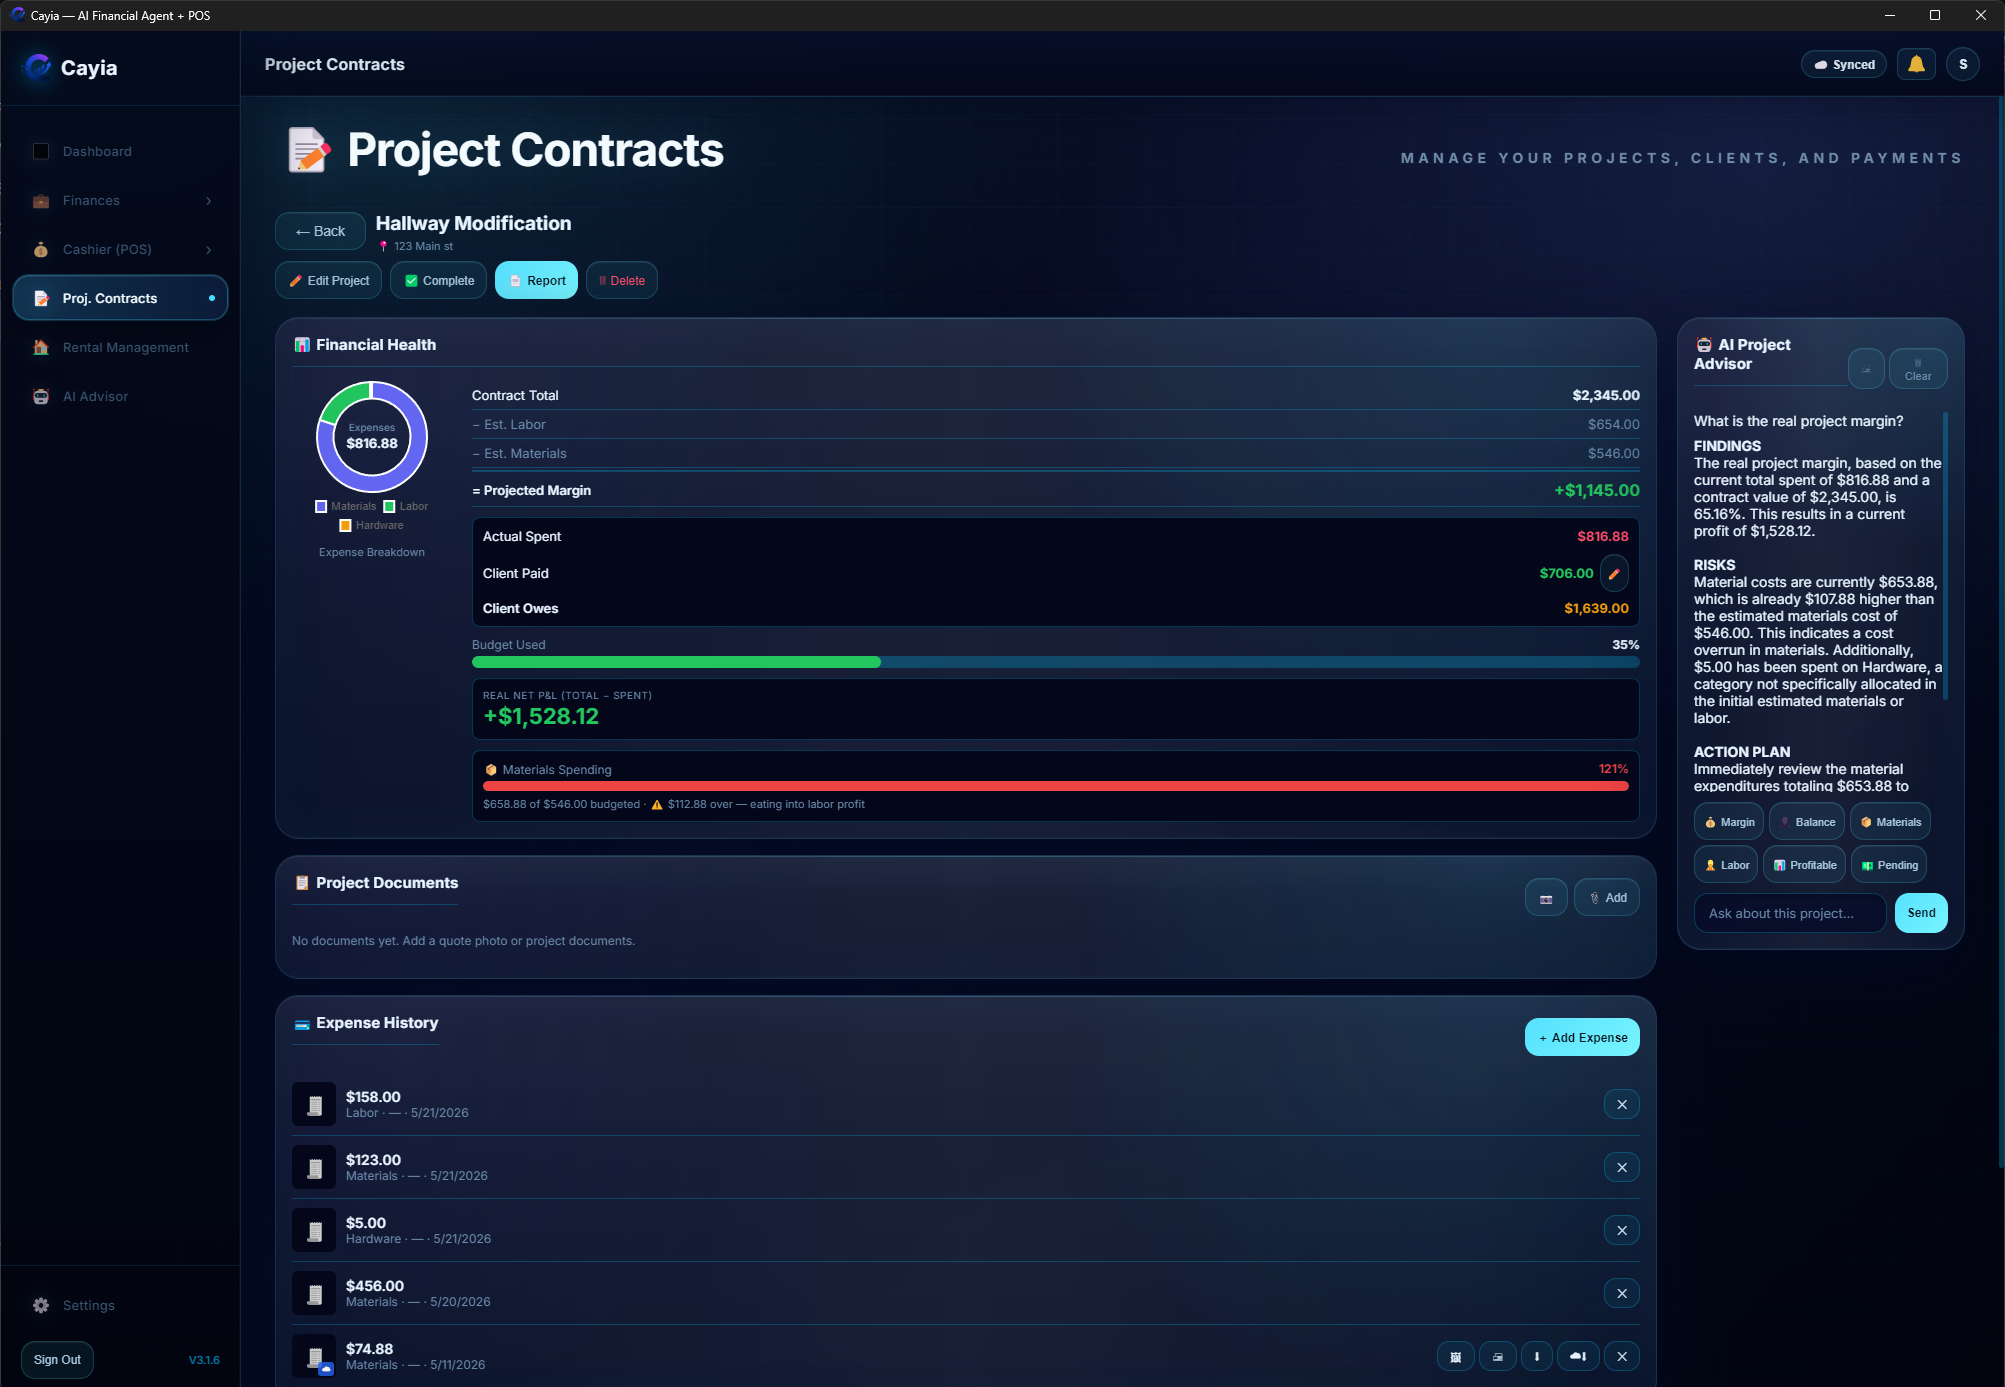
Use Project Contracts
Create project contracts, track spending, attach photos, collect payments, and monitor net profit.
What this helps you do
Project Contracts turns each job into its own control panel with contract total, estimated costs, actual expenses, client payments, budget usage, and AI project questions.
When to use it
Use it for remodels, service jobs, custom work, field projects, construction, repair jobs, and any project with stages or client payments.
Steps
Open Project Contracts.
Create a new contract and add the client name.
Add the project price, estimated labor, materials, and expected margin.
Divide the project into stages when you need progress tracking.
Add client payments and attach photos or documents as evidence.
Review financial health, expense history, budget usage, and net P&L.
Generate a contract or project report when ready.
Important tips
Project Contracts is exclusive to Master Plan / Pro Business.
Attach photos per stage so the project history is clear later.
Use AI Project Advisor to ask about profitability, balance, materials, and pending work.
Common problems
If a project margin looks wrong, review contract total, estimated costs, actual expenses, and payments.
If photos do not attach, check file format and connection.
Video tutorial
Video tutorial coming soon
Rent Management
Rent Management
Organize properties, units, tenants, leases, rent, fees, payments, overdue balances and rental reports inside the same ™Cayia control center used for the rest of your business.
What this helps you do
Rent Management helps landlords and property managers keep rental activity connected to the bigger financial picture. Use it to track who owes rent, what has been paid, which fees were added, which accounts are overdue, and how rental income affects your dashboard and reports.
When to use it
Use this module when you manage one rental property, several units, a small apartment complex, daily rentals, or rental income alongside another business. It is especially useful when more than one person helps record payments, attach proof, or review balances from synced devices.
Steps
Open Rent Management from the main navigation or from the Work area if your layout groups rental tools there.
Create a property and give it a clear name, such as the street address, building name, or rental business nickname.
Add units when the property has more than one rentable space, and label each unit consistently, such as Unit 1A, Apt 2, Studio B, or Daily Rental Room 3.
Add the tenant or renter profile with the name, contact details, move-in date, and any notes your team needs to recognize the account.
Enter lease basics, including lease start, lease end, monthly rent amount, deposit information, rent due day, and payment expectations.
Register the monthly rent charge for the correct tenant, unit, date, and billing period before recording payments.
Add extra charges or fees when needed, such as utilities, repairs, cleaning, parking, late fees, deposits, or other agreed charges.
Record full or partial payments as they arrive, including the payment date, method, amount, and any note that explains the payment.
Attach proof when available, such as a receipt image, signed note, check photo, bank confirmation, lease document, or payment screenshot.
Review the balance due after every charge or payment so you can see paid amounts, remaining balance, overdue rent, and open fees.
Apply late fees only after confirming the due date, grace period, local rules, and the tenant account. Add a note explaining why the fee was applied.
Use reminders or alerts to follow up before and after due dates, especially for accounts with partial payments or repeated overdue balances.
Check how rental income and expenses affect the dashboard, reports, and cash flow so rental activity stays aligned with the rest of your business records.
Generate or review rental reports when you need a summary for the owner, tenant, accountant, property manager, or your own records.
Important tips
Use one naming pattern for all properties and units so synced teams can find the right account quickly.
Record charges before payments. This keeps balances, reports, and overdue status easier to understand later.
For partial payments, enter only the amount received and leave the remaining balance open instead of editing the original rent charge.
Attach proof to important payments and fees so there is a clear history if a tenant, partner, or accountant asks for details.
Review overdue accounts regularly and add notes after every follow-up call, message, notice, or payment promise.
Keep lease dates and due dates accurate because reminders, balances, late fees, and reports depend on those fields.
When multiple devices are synced, refresh before entering a payment and avoid two users editing the same tenant at the same time.
Use separate units for separate rentable spaces, even if they belong to the same property. This improves reporting and prevents mixed balances.
Common problems
The tenant balance looks too high. Review extra charges, late fees, duplicate rent entries, and partial payments before changing the balance manually.
A payment does not reduce the balance. Confirm the payment was saved to the correct tenant, property, unit, and billing period.
A late fee was applied too early. Check the rent due date, grace period, and account notes, then remove or adjust the fee if it was added by mistake.
The wrong tenant appears under a unit. Open the tenant profile and confirm the assigned property/unit before recording new rent or payments.
A property report is missing activity. Check that charges and payments were assigned to the property and not saved as general income or expenses.
Two devices show different balances. Confirm Cloud Sync is active, refresh both devices, and avoid editing the same tenant from two devices at once.
Proof attachments are missing. Check file size, connection, and whether the attachment was saved before leaving the screen.
Monthly rent is duplicated. Look for repeated rent charges for the same tenant and month, then keep the correct entry and remove or correct the duplicate.
Reminders are not appearing. Verify lease dates, rent due day, notification settings, and whether the account is marked active.
Dashboard totals do not match expectations. Review whether rental income, fees, payments, and property expenses were categorized consistently.
Tenant Portal
Cayia Tenants Portal
Cayia Tenants is a separate renter-facing portal where tenants can review their rental account, payments, lease details, repair requests, announcements, chat messages, and account settings without entering the owner’s main business app.
The portal gives renters a clear dashboard for the information they usually need most: current balance, overdue months, next payment, property details, lease dates, late fees, announcements from the landlord, repair requests, and chat communication.
When to use it
Use the Tenant Portal when a renter needs to check what is owed, confirm payment history, review lease information, submit a repair request, read an announcement, or message the landlord/property manager.
Main portal areas
Home: shows current balance, overdue status, announcements, next payment, and property summary.
Lease: shows lease start, lease end, monthly rent, late fees, due dates, and related lease details.
Repairs: lets tenants submit or follow repair and maintenance requests.
Chat: keeps tenant communication with the landlord or property manager in one place.
Settings: helps the tenant manage account preferences and portal access.
Steps
Open the portal at https://cayia-sync-tenant.web.app/.
Sign in with the email connected to the tenant account.
Open Home to review current balance, overdue alerts, announcements, next payment, and property details.
Use Payments to check payment history, open balances, paid amounts, late fees, and partial payments.
Use Lease to review monthly rent, due date, lease start, lease end, and important agreement details.
Use Repairs when the tenant needs to report a maintenance issue or follow up on a repair request.
Use Chat to communicate with the landlord or property manager without mixing messages with personal texting apps.
Use Settings to manage account access or preferences available to the tenant.
Review landlord announcements regularly so important notices are not missed.
If something looks wrong, contact the landlord/property manager before submitting duplicate payments or repair requests.
Important tips
The Tenant Portal is separate from the owner’s main Cayia business app.
Balances and lease details depend on what the landlord or property manager has entered in Rent Management.
Overdue alerts can show past months, late fees, and remaining balances.
Tenants should check the next payment card before assuming the account is fully current.
Repair requests should include clear details and, when available, photos or proof.
Announcements are landlord messages, such as notices, reminders, policy updates, or payment-related messages.
If payment information looks incorrect, verify the month, amount, partial payments, and late fees with the landlord.
Common problems
The tenant cannot sign in. Confirm the email is the same one connected to the tenant account and reset the password if needed.
The balance looks wrong. Review overdue months, late fees, partial payments, and the next payment amount before contacting the landlord.
A payment is missing. Check whether it was applied to the correct month, property, unit, and tenant account.
The lease dates look incorrect. Ask the landlord/property manager to verify lease start, lease end, and monthly rent in Rent Management.
Repair status is not updated. Send a chat message or follow up with the landlord/property manager.
Announcements are not visible. Refresh the portal and confirm the tenant is signed into the correct account.
The tenant sees the wrong property. The landlord should verify the tenant is assigned to the correct property and unit.
Chat messages are delayed. Check internet connection, refresh the portal, and verify the account is still connected.
Users & Team
Manage users and cashiers
Create user access for team members and limit what each person can do.
What this helps you do
Team controls help separate owner access from cashier or employee access.
Steps
Open settings or the users area.
Create a user or cashier profile.
Assign the correct role and permissions.
Limit access to sensitive business areas when needed.
Deactivate users who no longer need access.
Important tips
Business supports up to 3 users / cashiers.
Master Plan / Pro Business supports up to 7 users / cashiers.
Common problems
If a user cannot access a feature, review plan limits and assigned permissions.
Video tutorial
Video tutorial coming soon
Synchronization
Synchronization & Cloud Sync Help
Understand how ™Cayia syncs authorized devices, team members, photos, PDFs, permissions, and temporary cloud file transfers.
What Sync is for
™Cayia uses intelligent synchronization between authorized devices and users. It is not only a backup tool. Sync helps owners share workspaces, keep teams updated, move files when needed, and control who can access each part of the business.
Local firstMost business data lives on the user's device so daily work stays fast and controlled.
Temporary cloud transferCloud Sync helps move updates, photos, PDFs, and attachments between approved devices.
Owner controlThe owner controls devices, team access, permissions, and original files.
Settings > Sync
Use this area when you need ™Cayia on multiple devices, when a team member needs access, when photos or PDFs must move between devices, or when you need to review sync security.
Sync Devices: review connected devices, users, plan limits, and license space.
Sync Security: review the active license, sync access, and Sync Password.
File Synchronization Photos & PDF: send photos, receipts, PDFs, and attachments between devices.
My Connection Account: switch between a personal account and an invited workspace.
Invite Team Member: invite guests, staff, or team members by email.
Synchronization History: review when sync happened and which device was involved.
Sync Devices
Sync Devices helps the owner understand which phones, computers, tablets, and users are connected to the workspace.
View connected devices and synchronized users.
Check device, team member, and sync connection limits for the active plan.
Remove old phones or computers that are no longer used.
Free a license slot before adding a replacement device.
Disconnect devices that should no longer receive business updates.
Sync Security
Sync Security is where the owner reviews the active license and manages the credentials used to protect synchronization access.
Important security warning
Keep the Sync Password secure. If the Sync Password is lost, recovery may require contacting ™Cayia support as a last option. Do not share it with users who should not control sync access.
Review the current Active License.
Change the Sync Password when access needs to be refreshed.
Review who should be allowed to synchronize with the workspace.
Update access after staff changes, lost devices, or role changes.
File Synchronization - Photos & PDF
File Synchronization moves photos, receipts, PDFs, and attachments between devices when needed. ™Cayia uses Firebase for temporary transfers, but the cloud is not the main permanent storage location for most files.
By default, original photos and PDFs live on the owner's device.
Cloud transfer is temporary and controlled, not a permanent document vault.
Other devices can download temporary copies while syncing.
The owner can upload existing photos, push images, share receipts, share PDFs, and update existing photos.
Use Upload Existing Photos when older local images need to be shared with approved devices.
Use Update Existing Photos when a changed file needs to be refreshed across devices.
Use Purge Temporary Files or Clear All Cloud Temporary Files to remove temporary cloud copies when they are no longer needed.
My Connection Account
If multiple ™Cayia accounts are used on the same device, My Connection Account helps the user choose the correct workspace before syncing or entering data.
View connected personal and invited workspace accounts.
Switch Account when moving between personal work and an owner's workspace.
Remove old accounts from the device when they are no longer needed.
If business data appears missing, confirm the user is inside the correct invited workspace.
Invite Team Member
The owner can invite team members, guests, staff, or synchronized users by email. Use the same email the teammate used to create their ™Cayia account.
The teammate creates or signs in to their own ™Cayia account using their email.
The owner opens Settings > Synchronization > Invite Team Member.
The owner enters the same email the teammate used for their ™Cayia account.
The teammate keeps ™Cayia open so the invitation can appear in their app.
The teammate accepts the invitation from their app.
The owner approves the accepted invitation.
The owner assigns permissions from the approval flow or from Settings > Team Access.
After approval, sync is active and the teammate can work inside the invited workspace according to the assigned permissions.
Synchronization History
Synchronization History helps users and owners review recent sync activity and understand whether devices are updating correctly.
See when synchronization happened.
Review which device synchronized.
Check cloud activity and sync timing.
Use the history when troubleshooting stale data or missing updates.
Clear history or remove old logs when the list is no longer useful.
Permissions and account switching
Guest users can switch between their personal account and the invited workspace from Settings > Synchronization > My Connection Account. If a teammate says they cannot see the owner's data, confirm they are inside the invited workspace account and not their personal account.
Guest access can be full access when the owner wants the teammate to help across the workspace.
Guest access can be restricted when the owner only wants the teammate to manage specific areas.
The owner can allow dashboard access or remove dashboard access.
The owner can allow finances access or remove finances access.
The owner can assign responsibilities by operational area, task, project, assigned item, or tenant-related work when configured.
A cashier can be limited to POS work, while a supervisor can be allowed to submit receipts, photos, or updates for assigned projects or tenant operations.
Device and team control
The owner controls synced devices from Settings > Synchronization > Synchronized Devices. From there, the owner can view synced devices and remove or kick a device that should no longer connect.
Team permissions are managed from Settings > Team Access. The owner can grant permissions, edit permissions, remove members, or kick members who should no longer have access.
Important tips
Business includes Cloud Sync for 3 devices.
Master Plan / Pro Business includes 15 devices via Cloud Sync.
Some plans also limit team members and sync connections, so review the plan before inviting more users.
Invite teammates using the exact email they use in ™Cayia.
Keep the Sync Password secure and update it when access should be refreshed.
Do not treat temporary cloud files as permanent backup. Keep important originals on the owner's device or exported records.
Review permissions after every role change so users do not keep old access.
When a teammate changes phones or computers, remove the old device before relying on the new one.
Do not enter the same transaction twice while waiting for sync. Refresh and confirm the active workspace first.
FAQ and common problems
Are my data in the cloud?
™Cayia is designed as local-first for most data. Cloud Sync helps move approved updates and temporary files between authorized devices.
What does ™Cayia keep locally?
Business records and many files are kept on the user's device. Cloud Sync is used when sharing, syncing, or transferring content to approved devices.
Are photos and PDFs stored permanently in the cloud?
No. Most photos and PDFs are not meant to live permanently in the cloud. The cloud is used for temporary transfer, and the owner can purge temporary files.
Can I use multiple accounts on one device?
Yes. Use My Connection Account to switch between a personal account and invited workspace accounts.
Invitation not received: keep the teammate's app open, confirm internet access, and send the invite again if needed.
Wrong email used: cancel or ignore the wrong invite and send a new one to the exact email used for the teammate's ™Cayia account.
Guest app was not open: ask the teammate to open ™Cayia, then resend or wait for the invitation to appear.
Owner has not approved yet: the teammate may appear pending until the owner approves and assigns permissions.
User appears but has no access: review Settings > Team Access because permissions may be too restrictive.
Guest sees personal data instead of owner workspace: switch accounts from Settings > Synchronization > My Connection Account.
Device needs to be reset: remove or kick the device from Synchronized Devices, then connect it again.
Sync appears stale: confirm Cloud Sync is active, refresh the app, and verify the user is in the correct workspace account.
Device limit reached: remove an old device to free a license slot, then add the new device again.
Photos or PDFs do not appear: run the file synchronization action again and confirm temporary files have not been purged.
Owner purged temporary files: upload or push the needed files again from the device that holds the originals.
Sync Password is lost: check secure records first. If it cannot be recovered, contact support as a last option.
Dashboard or finances are missing: the owner may have removed dashboard or finances permission for that guest.
Assigned work is missing: confirm the user is assigned to the correct project, task, item, tenant, or operational area.
Future screenshots
Sync screenshots coming soon
Video tutorial
Video tutorial coming soon
Reports
Import files and export reports
Bring in PDF, CSV, or Excel files when supported, and export clean reports from ™Cayia.
What this helps you do
Reports help you review performance, share information, keep records, and prepare summaries for your own use or professional review.
Steps
Open the report area for the module you want to export.
Choose PDF for a visual report or CSV for spreadsheet use.
Select the period, category, project, or dataset.
Generate the report and review it before sharing.
Save, download, or print the report.
Important tips
Review imported PDF, CSV, or Excel data before treating it as final.
Export regularly so you have offline records.
Common problems
If a report does not download, check browser download permissions and popup blocking.
Video tutorial
Video tutorial coming soon
Support Center
Support Center
Contact ™Cayia support, report problems, request account or license help, and send technical questions from one organized place.
Use the Support Center when you need help with subscriptions, billing, license recovery, Cloud Sync, account access, Sync Password recovery, device problems, API configuration, team permissions, bug reports, or feature requests.
Fast routingChoose the category first so the request is easier to review.
Clear detailsInclude account email, device name, priority and description.
Email readyYour request is prepared for support@cayia.app with the important details included.
Quick Help Categories
Pick the closest topic. ™Cayia will preselect the category in the support form and move you to the details area.
Contact Support Form
Complete the form below. When you send it, your email app will open a prepared message addressed to support@cayia.app.
Quick Support FAQ
How do I recover my license?
Use the License Recovery category and include your ™Cayia account email, license ID if available, and any Stripe billing email used for payment.
How do I reset sync password?
Choose Sync Problem or Reset Sync Password, include the owner account email, and describe whether the password is lost or needs to be changed for security.
How do I remove a device?
Go to Settings > Synchronization > Synchronized Devices. If you cannot remove it, choose Device Removal and include the device name.
Why is my sync failing?
Check the active workspace, internet connection, device limit, owner approval, and Cloud Sync status. Send a Sync Problem request if it continues.
How do I upgrade my subscription?
Open Settings > Subscription and choose Switch To [New Plan]. If the upgrade fails, choose Subscription Upgrade or Billing Problem.
How do I cancel billing?
Open Settings > Subscription and use Billing Portal or Manage Subscription. Stripe Billing Portal handles cancellation.
Why is my AI API not responding?
Check provider billing, API key permissions, selected provider, model access and internet connection. Choose API Configuration if you need help.
How do I restore my account?
Choose Account Recovery and include your ™Cayia account email, device name, and what changed before access was lost.
Prepared for future smart support
This Support Center is structured so ™Cayia can grow into a full support platform later.
Ticket SystemTrack requests with ticket IDs and statuses.
AI Support AssistantGuide users to the right help article before sending a request.
Live ChatAdd real-time support when available.
Knowledge SearchSearch articles, FAQs, troubleshooting and plan-specific guides.
Ticket TrackingLet users review open and closed requests.
Status UpdatesShow billing, sync or app service updates.
Support HistoryKeep past conversations organized by account.
FAQ
Frequently asked questions
Quick answers to common questions about ™Cayia, AI, sync, plans, and support.
Does ™Cayia include an API key?
No. ™Cayia uses BYOK. You connect your own API key from a compatible provider.
Are my data used to train public AI models?
™Cayia is designed around user control. AI usage depends on the provider you connect, so review your provider privacy settings and terms.
Can I use ™Cayia without AI?
Yes. Core tracking, POS, inventory, reports, and project workflows can be used without advanced AI features.
Can I use ™Cayia without internet?
Some local workflows may be available depending on the app version, but Cloud Sync, sign-in, AI, and cross-device updates require internet.
Can I use ™Cayia on multiple devices?
Yes, if your plan includes Cloud Sync. Business includes 3 devices, and Master Plan / Pro Business includes 15 devices.
Can I change plans?
Yes. Open Settings > Subscription, choose the new plan, and use Switch To [New Plan]. Stripe handles the payment update securely.
What happens if my API key fails?
AI features may stop until you update the key, provider billing, model access, or configuration.
Can I cancel my subscription?
Yes. Open Settings > Subscription and use Billing Portal or Manage Subscription. Stripe Billing Portal handles cancellation and billing changes.
Where is my information stored?
™Cayia is local-first for most business data. Cloud Sync helps share approved updates and temporary files between authorized devices when sync is active.
Open this tutorial on YouTubeYouTube blocks embedded playback from local file pages. A YouTube tab will open so you can watch it normally.Watch on YouTube